📜 Understand your commission statement

Statement
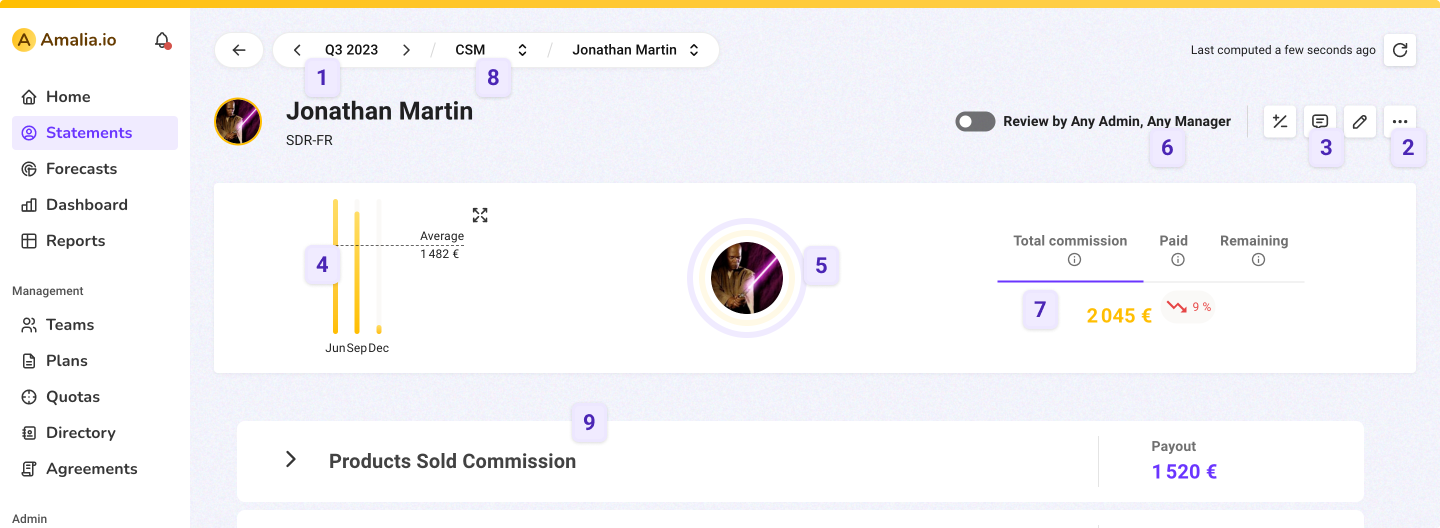
1. Time period
Every statement is delimited in a time period. The time period for your organization is set up by the administrator (annual, biannual, quarterly, monthly, ...). You can browse between time periods to see your previous statements.
2. Export
Click on three dots to see other options, you'll see an export option. Export your statement in a XLXS file (Personio and Payfit exports are also available) so you can manipulate the data with an external tool.
3. Comment
If you spot a mistake or want to ask a question about your statement, you can add a comment. This function allows you to discuss with your manager directly in Amalia. Read more about this functionality in the dedicated page.
4. History Payout
This little bar diagram on the left shows your latest payouts. Click on a bar to see the statement of this period.
5. Highlighted KPI
Around your profile picture, there are two gauges setup by your administrator based on the KPI he wants to follow.
6. Workflow
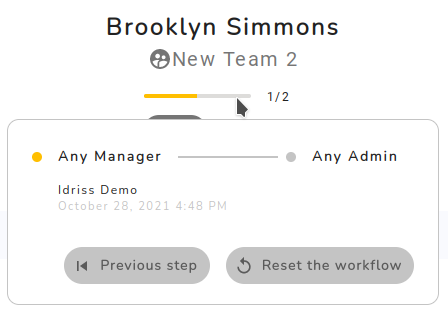
The toggle "Unreviewed / Reviewed" is used to mark your statement as reviewed and ready for the payout crew. Depending on how your administrator configured the workflow, you may have to review your own statement by clicking on this button. If your workflow has multiple review steps, a progress bar will be displayed with the list of the person that participated in the process.

7. Payout summary
On the right, you have the current value of your payout and its evolution from the previous time period.
8. Plan Name
Here is the name of the Plan you are assigned to. If there's the little arrow icon next to this name, it means you are assigned to several plans and probably have several statements. To switch between your statements, you can click on this icon to see a list of your other plan(s), and click on the one you would like to see.

9. Rules calculated in your statement.
Statement details, in the form of rules, are available below the header. You can consult each rule and adjustments by expanding the section.
Rule details

For a given rule you can:
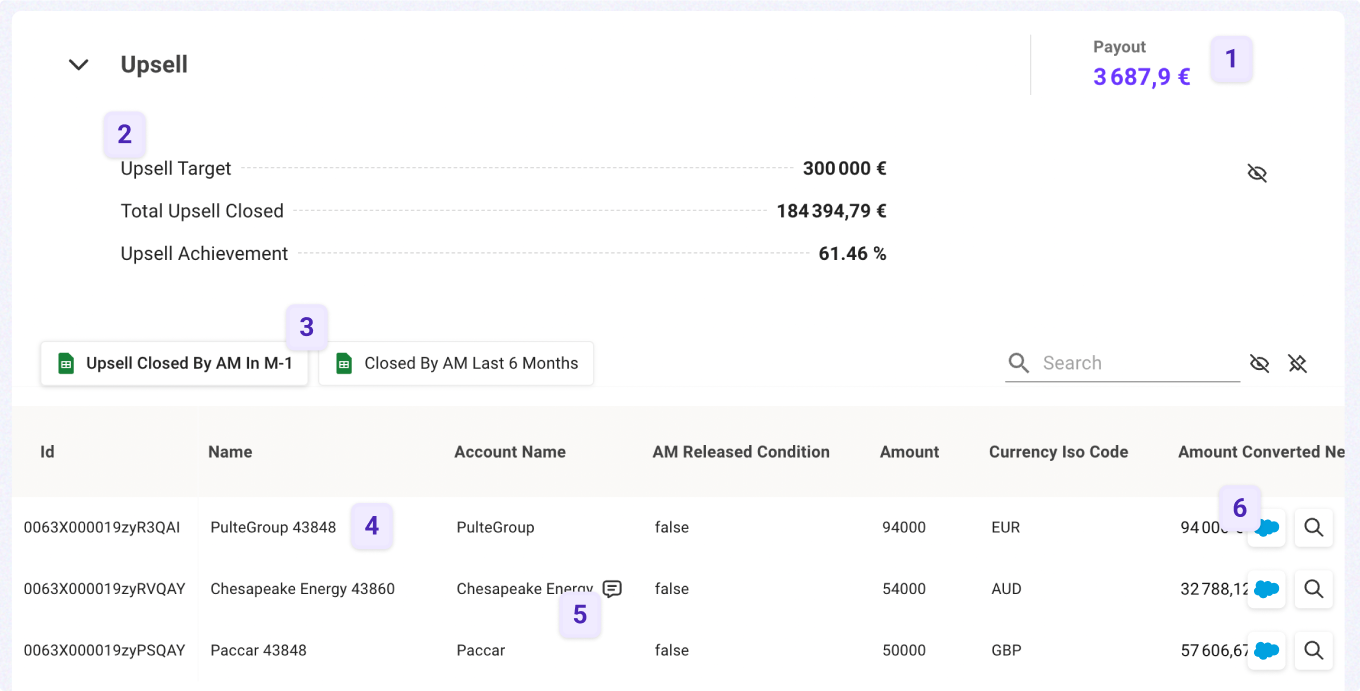
1. Visualize total payout for the rule and vizualise calculation details by clicking on the amount.
2. Visualize KPIs related to your rule
3. Vizualize several data view and switch between them : for example have a view on deals closed in M-1 and a second view on deals closed in last 6 months.
4. View deals details according to the selecting data view.
5. Comment or check existing comment on a specifuc deal.
6. View a deal in its source CRM by clicking on the button.
Rule total payout
If you click on the total amount, you'll access a tracing page that exposes all the calculation details.

Rule details
If you want to dig in the rule details, you can unfold the rule by clicking on it. You will see some useful kpis on the top, followed by a list of all the records (deals, invoices,...) details used to compute the rule.
Kpis

Highlighted with purple color, are kpis which have been modified by your administrator. You can see the modification detail and the name of the author with a simple hover.
Records

Source CRM
If you would like to view a deal from its source CRM, you can do so by clicking on the CRM icon button on the end of the row for the deal. This feature currently supports Salesforce and Hubspot data connections.

Comments and adjustments
If you spot a mistake or want to ask a question about a specific record (deal, invoice,...), you can add a comment by clicking the comment icon on the right. This function allows you to discuss with your manager directly in Amalia. Read more about this functionality in the dedicated page.
Payments
Payments are handled on a separate view. Read more in the dedicated page.
